Post by Sunjo on Feb 21, 2007 0:51:56 GMT
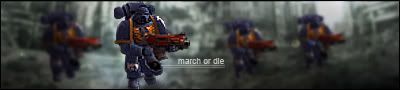
Today, Boys and Girls. We will be making something like this:

1. Well first off, create a new 400x400 document in photoshop. (ctrl+N) Then fill it with #373737.
Create a new layer (Ctrl+Shift+N).
Now, select an area near the top about 10 pixels in hieght, and select the gradient tool, and change the colors to something simular to this:

Use the gradient tool to fill the selection, go from the bottom, to the top, you should now have something simular to this:

2. Create a new layer (Ctrl+Shift+N). Now select the pen tool, and "draw" something like this:

How I did this:
First I clicked in the middle, a little above the gradient with the pen tool.
Then I held shift and clicked and clicked on the edge of the left corner.
Then I held shift and clicked in the middle of the image, on the left side.
Then I held shift (keep holding shift until the end of this explanation) and clicked a little bit left of where I FIRST clicked the pen tool, then.. while still holding shift, and still holding my hand down on the click button, I moved the mouse a bit to the left.
Then I right clicked and selected "Make Selection" (feather radius on 0)
And I filled the selection with a gradient, and got rid of any bit that was over the first gradient, you should have something like this now:

3. Now duplicate your second layer (the first gradient layer) and bring it to the top, then set the opacity to 20%. You should now have something like this:

4. Create a new layer (Ctrl+Shift+N). Now make a selection like this:

Now select the gradient tool, and use these colors:

Going right to left, fill the selection with the gradient tool, you should now have something like this:

5. Create a new layer (Ctrl+Shift+N). Now make some random black circles, and lower the opacity so that it looks like this:

6. Create a new layer (Ctrl+Shift+N). Now select the Elliptical Marquee tool, and make two circle selections like this:

Now fill them with a dark/white gradient, you should now have something simular to this:

7. Now here's the tricky part, first create a new layer (Ctrl+Shift+N) and take out the pen tool. Click in the place where the image shows you to click:

Now while holding shift click where this image shows you to click:

Now, while still holding shift move your mouse up a little bit over the top of the image, or diagonally to the left, like this:

Do NOT de-select the pen tool, leave everything how it is!
(Until I say it's safe to deselect at least)
Now change your foreground color to #161616 and select the brush tool. Reset your brushes, then select the 9 pixel hard round brush. Now select your pen tool again, right click on your image and select "Stroke Path". Make sure "Simulate Pressure" Is checked, And use "Brush" as the tool. You should now have something like this:

(and you can deselect now) ;)
Now duplicate the layer and rotate it a bit to the right (Edit>Transform>Rotate). Now set both of your layer's Opacity to 70%. You should now have something like this:

8. Create a new layer (Ctrl+Shift+N). Now make a selection and fill it with 76a0b6, like this:

Now add a pattern to it, I won't tell you how to, as it's not really nessessary, you can use your imagination and add something else if you'd like. Here is what I have now:

9. Create a new layer (Ctrl+Shift+N). Now make your foreground color "white", and select some grunge brushes, brush randomly like this:

10. This is the final step! Save your PSD (You MUST do this, or you will lose all your work on this step). Create a new layer (Ctrl+Shift+N). Delete you very first layer (the solid color background layer). Now go to "Image>Apply Image". Then go to "Edit>Transform>Skew". Make it 11.0, and 10.0% width to hieght. Now, delete all of your OTHER layers, after you've saved the PSD. Sharpen the image (filter>sharpen>sharpen), you should now have something like this:

11. Now select a small area of the bottom left corner, and hit Ctrl + T. Then drag it downwards a bit, like so:

Do the same thing with the top right corner of the image. (do not include the blue part when you stretch the top right conrer, or it will look bad). Make it look like this:

Now duplicate this layer (right click on the layer, and select duplicate layer), and go to "edit>transform>flip horizontal". Move this layer over a bit so the bar isn't overlaping with the first layer. Now merge this layer with the other tech layer. You should now have something like this:

Now duplicate the tech layer (it should still be your only layer). And move it slighty below the other layer. Like this:

Now Merge all your layers (Layer>Merge Visable). Duplicate your only layer and go to "edit>transform>flip vertical". And move this layer down a bit so it doesn't overlap with the original tech layer. Now, again, merge all your layers. You should now have something like this:

12. Create a new layer (Ctrl+Shift+N). Move this layer to the bottom of the layer list. Now make a selection like this:

Fill this with a dark color, I used #262626. You should have something simular to this now:

Now you're done! Here is my result from using this same technique, with just a few extra effects:
-----
If you enjoyed this tutorial - Please register, it only takes a minute. (maybe less) =P
1. Well first off, create a new 400x400 document in photoshop. (ctrl+N) Then fill it with #373737.
Create a new layer (Ctrl+Shift+N).
Now, select an area near the top about 10 pixels in hieght, and select the gradient tool, and change the colors to something simular to this:
Use the gradient tool to fill the selection, go from the bottom, to the top, you should now have something simular to this:
2. Create a new layer (Ctrl+Shift+N). Now select the pen tool, and "draw" something like this:
How I did this:
First I clicked in the middle, a little above the gradient with the pen tool.
Then I held shift and clicked and clicked on the edge of the left corner.
Then I held shift and clicked in the middle of the image, on the left side.
Then I held shift (keep holding shift until the end of this explanation) and clicked a little bit left of where I FIRST clicked the pen tool, then.. while still holding shift, and still holding my hand down on the click button, I moved the mouse a bit to the left.
Then I right clicked and selected "Make Selection" (feather radius on 0)
And I filled the selection with a gradient, and got rid of any bit that was over the first gradient, you should have something like this now:
3. Now duplicate your second layer (the first gradient layer) and bring it to the top, then set the opacity to 20%. You should now have something like this:
4. Create a new layer (Ctrl+Shift+N). Now make a selection like this:
Now select the gradient tool, and use these colors:
Going right to left, fill the selection with the gradient tool, you should now have something like this:
5. Create a new layer (Ctrl+Shift+N). Now make some random black circles, and lower the opacity so that it looks like this:
6. Create a new layer (Ctrl+Shift+N). Now select the Elliptical Marquee tool, and make two circle selections like this:
Now fill them with a dark/white gradient, you should now have something simular to this:
7. Now here's the tricky part, first create a new layer (Ctrl+Shift+N) and take out the pen tool. Click in the place where the image shows you to click:
Now while holding shift click where this image shows you to click:
Now, while still holding shift move your mouse up a little bit over the top of the image, or diagonally to the left, like this:
Do NOT de-select the pen tool, leave everything how it is!
(Until I say it's safe to deselect at least)
Now change your foreground color to #161616 and select the brush tool. Reset your brushes, then select the 9 pixel hard round brush. Now select your pen tool again, right click on your image and select "Stroke Path". Make sure "Simulate Pressure" Is checked, And use "Brush" as the tool. You should now have something like this:
(and you can deselect now) ;)
Now duplicate the layer and rotate it a bit to the right (Edit>Transform>Rotate). Now set both of your layer's Opacity to 70%. You should now have something like this:
8. Create a new layer (Ctrl+Shift+N). Now make a selection and fill it with 76a0b6, like this:
Now add a pattern to it, I won't tell you how to, as it's not really nessessary, you can use your imagination and add something else if you'd like. Here is what I have now:
9. Create a new layer (Ctrl+Shift+N). Now make your foreground color "white", and select some grunge brushes, brush randomly like this:
10. This is the final step! Save your PSD (You MUST do this, or you will lose all your work on this step). Create a new layer (Ctrl+Shift+N). Delete you very first layer (the solid color background layer). Now go to "Image>Apply Image". Then go to "Edit>Transform>Skew". Make it 11.0, and 10.0% width to hieght. Now, delete all of your OTHER layers, after you've saved the PSD. Sharpen the image (filter>sharpen>sharpen), you should now have something like this:
11. Now select a small area of the bottom left corner, and hit Ctrl + T. Then drag it downwards a bit, like so:
Do the same thing with the top right corner of the image. (do not include the blue part when you stretch the top right conrer, or it will look bad). Make it look like this:
Now duplicate this layer (right click on the layer, and select duplicate layer), and go to "edit>transform>flip horizontal". Move this layer over a bit so the bar isn't overlaping with the first layer. Now merge this layer with the other tech layer. You should now have something like this:
Now duplicate the tech layer (it should still be your only layer). And move it slighty below the other layer. Like this:
Now Merge all your layers (Layer>Merge Visable). Duplicate your only layer and go to "edit>transform>flip vertical". And move this layer down a bit so it doesn't overlap with the original tech layer. Now, again, merge all your layers. You should now have something like this:
12. Create a new layer (Ctrl+Shift+N). Move this layer to the bottom of the layer list. Now make a selection like this:
Fill this with a dark color, I used #262626. You should have something simular to this now:
Now you're done! Here is my result from using this same technique, with just a few extra effects:
-----
If you enjoyed this tutorial - Please register, it only takes a minute. (maybe less) =P